



Why Fixing Small Cracks in Your Concrete Driveway Matters More Than You Think
Fixing small cracks in a concrete driveway is one of the most important maintenance tasks a homeowner can do — and it’s easier than most people expect. Here’s how to do it fast:
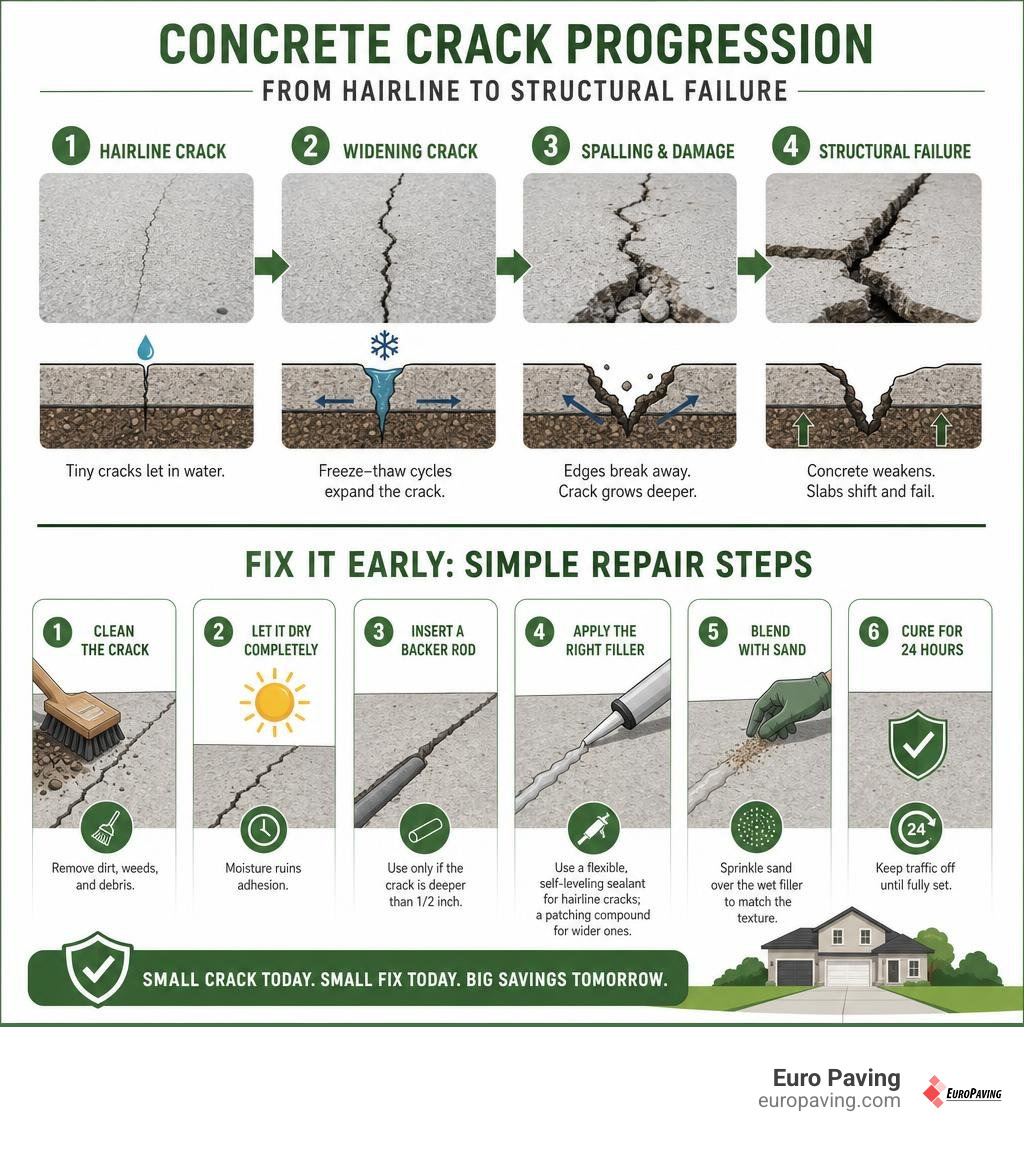
Quick answer — how to fix small concrete driveway cracks:
- Clean the crack — remove all dirt, weeds, and debris with a wire brush or pressure washer
- Let it dry completely — moisture ruins adhesion
- Insert a backer rod (only if the crack is deeper than 1/2 inch)
- Apply the right filler — use a flexible, self-leveling sealant for hairline cracks; a patching compound for wider ones
- Blend with sand — sprinkle sand over the wet filler to match the surrounding texture
- Cure for 24 hours — keep traffic off until fully set
Nearly 60% of concrete driveways develop cracks within the first 10 years. That’s not bad luck — it’s just how concrete behaves. It expands in heat, contracts in cold, and shifts as the ground beneath it moves.
In the Chicago area, freeze-thaw cycles hit concrete especially hard. Water seeps into a small crack, freezes, expands, and forces the crack wider. What starts as a hairline crack can become a serious structural problem in just a few winters.
The good news? Caught early, most small cracks are a straightforward DIY fix. The key is acting before the damage spreads — because once a crack reaches a certain size, no amount of caulk will save you from a costly repair or full replacement.
This guide walks you through everything you need to know: what causes cracks, how to tell a cosmetic crack from a structural one, and exactly how to repair them the right way.
Glossary for fixing small cracks in concrete driveway:
Understanding What Causes Driveway Cracks and Assessing the Damage
Before you grab a wire brush and a tube of sealant, it helps to understand why your concrete is splitting in the first place. Concrete seems incredibly tough, but it is actually a rigid composite material that is highly susceptible to environmental pressures.
According to the Concrete Crack Repair Guide: How to Fix Cracks in Concrete Slabs – Concrete Network, the most common culprit behind new concrete cracks is drying shrinkage. When concrete is poured, it contains more water than is chemically necessary for curing. As this excess moisture evaporates, the slab shrinks slightly. If control joints are not cut deep enough or placed every 8 to 10 feet, random shrinkage cracks will inevitably form.
Other common causes of concrete cracking include:
- Subgrade Settlement: If the soil beneath your driveway was poorly compacted during installation, or if heavy rains erode the ground underneath, the concrete slab will lose its support. Without a solid foundation, the concrete bends under the weight of vehicles and cracks.
- Thermal Expansion: Concrete expands in the blistering summer heat and contracts during freezing Chicago winters. If there is no room for the slabs to move, they push against each other until they fracture.
- Clay Soil Expansion: Many Chicago suburbs, such as Hinsdale, Downers Grove, and Arlington Heights, have heavy clay soils. Clay expands significantly when wet and shrinks when dry, creating a continuous cycle of movement that slowly breaks down rigid concrete structures.
Identifying Cosmetic vs. Structural Concrete Damage
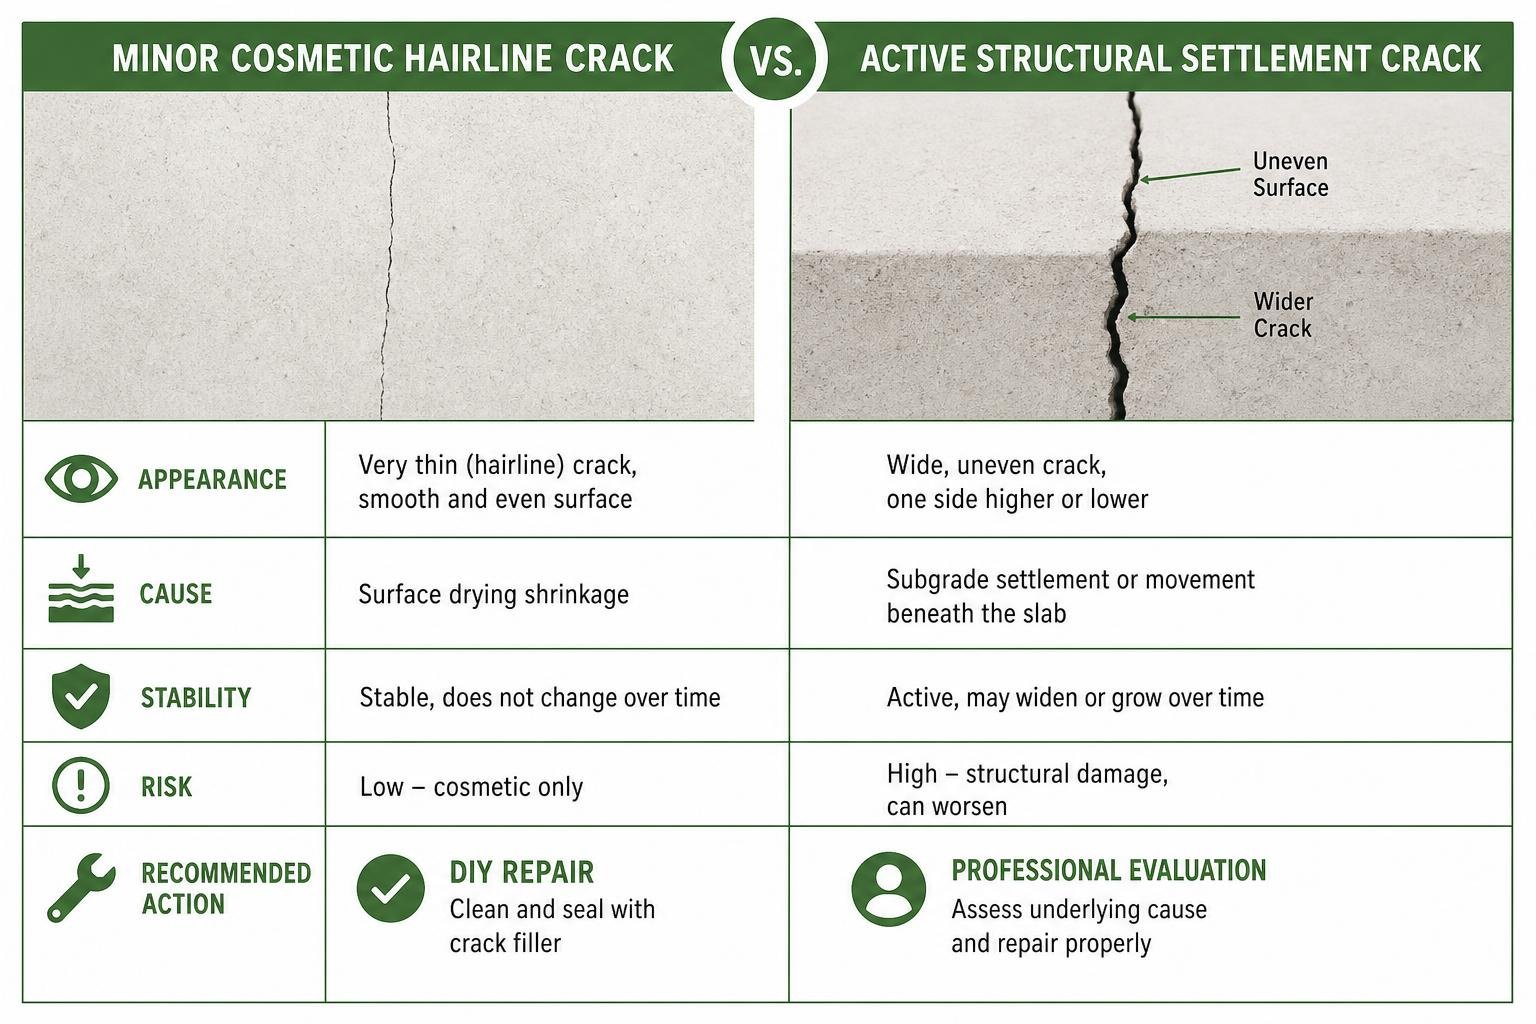
Not all cracks are created equal. Some are minor blemishes that you can easily patch in an afternoon, while others are warning signs of serious subsurface failure.
- Crazing (Fine Hairline Cracks): These look like a fine, web-like pattern on the surface of the concrete. They are purely cosmetic, caused by the surface drying too quickly during the initial pour, and do not threaten the structural integrity of the driveway.
- Static Hairline Cracks: Narrow cracks under 1/16 inch wide that do not change in size over time are usually harmless. However, they should still be sealed to prevent water infiltration.
- Active Structural Cracks: If you notice cracks that are continuously widening, or if one side of the crack is higher than the other (heaving or settling), you are dealing with a structural problem. For a deeper look into this issue, check out our guide on Fixing the Foundation of Your Sinking Driveway.
When DIY is Enough vs. When to Call a Professional
How do you know if you can handle this project yourself or if it is time to call in the experts? The general rule of thumb is the 1/4-inch threshold:
- Under 1/4 inch wide: If the cracks are narrow and the concrete slabs on either side are still level with each other, this is a perfect DIY project. Fixing small cracks in concrete driveway surfaces at this stage will prevent water from getting underneath and causing worse damage.
- Over 1/4 inch up to 1/2 inch wide: These can still be repaired by a dedicated DIYer, but they require more intensive preparation, such as undercutting the crack and using a foam backer rod.
- Over 1 inch wide or accompanied by settling/heaving: If your driveway has deep potholes, missing chunks, or slabs that have sunk several inches, DIY caulk will not help. This level of damage points to a failed subgrade or severe structural collapse. You will need to decide whether to Resurface or Replace Your Driveway Today.
Essential Tools and Materials for Fixing Small Cracks in Concrete Driveway
To achieve a professional-grade finish that lasts for years, you need the right gear. Don’t worry — you won’t need to rent heavy machinery. Most of these items can be found in any local hardware store in the Chicago suburbs.
Here is your ultimate shopping list:
- Cleaning Tools: A stiff wire brush, a heavy-duty broom, a hammer and chisel (for widening tight cracks), and a wet/dry shop vacuum or leaf blower.
- Application Equipment: A high-quality caulking gun, a flexible putty knife or margin trowel, and waterproof gloves.
- Safety Gear: Protective safety glasses, heavy-duty gloves, and a dust mask (crucial to avoid inhaling harmful silica dust when chiseling or brushing concrete).
- Repair Materials: Your chosen concrete crack filler, a foam backer rod (for cracks deeper than 1/2 inch), and a small bag of fine, clean sand.
Choosing the Best Sealant for Fixing Small Cracks in Concrete Driveway
Choosing the right filler chemical is critical to the longevity of your repair. Here is a breakdown of the most common options:
| Filler Type | Best Used For | Key Pros | Key Cons |
|---|---|---|---|
| Water-Based Latex | Narrow, static cosmetic cracks | Very easy to apply; fast cleanup with water; highly affordable. | Rigid when dry; prone to cracking if the concrete shifts. |
| Polyurethane / Synthetic Rubber | Active cracks subject to movement | Highly flexible; moves with thermal expansion; waterproof; extremely durable. | Can emit strong fumes; requires careful application; harder cleanup. |
| Epoxy Mixes | Deep, structural cracks | Creates an incredibly strong, permanent bond; can be sanded. | Rigid; expensive; requires precise mixing and fast application. |
For most residential concrete driveways, a flexible polyurethane or synthetic rubber-based sealant is the best choice. Concrete is constantly moving, and a rigid patch will simply crack again during the next harsh winter in Barrington or Skokie. To find the right product for your project, take a look at our review of the Stop the Split with These Top Driveway Crack Fillers.
Step-by-Step Guide to Repairing Small Concrete Cracks
Once you have gathered your tools and selected the right sealant, it’s time to get to work. Following a systematic approach ensures your repair remains intact through years of heavy vehicle traffic and changing seasons.
For a quick reference on the overall process, you can read the DIY Driveway Crack Repair in 5 Simple Steps | Family Handyman. Below, we break down the exact steps to guarantee a professional result.
Preparing and Cleaning the Crack
Ask any professional contractor, and they will tell you that around 70% of a repair’s success relies on the initial preparation work. If you apply sealant over dirt, weeds, or crumbling concrete, the filler will fail to adhere and peel away within a few weeks.
- Clear out vegetation: Use a flat screwdriver or pocket knife to scrape out any weeds and roots growing inside the crack.
- Chisel loose debris: Run a hammer and chisel along the edges of the crack to break away any loose, flaking concrete. If the crack is narrower than 1/4 inch, you can use the chisel to slightly widen and “undercut” the crack into an inverted V-shape. This gives the sealant a wider channel to bond with.
- Scrub thoroughly: Use a stiff wire brush to vigorously scrub the inside of the crack, freeing up stubborn dirt and concrete dust.
- Blow it clean: Use a leaf blower or a wet/dry shop vacuum to completely remove all dust and particles. For extremely dirty driveways, a pressure washer works wonders.
- Let it dry: If you used water to clean the driveway, you must wait at least 24 hours for the concrete to dry completely. Moisture trapped inside the concrete will ruin the adhesion of solvent-based polyurethane sealants.
For more detailed preparation techniques, check out our guide on How to Repair Driveway Cracks.
Applying the Filler and Blending for a Seamless Finish
Now that the crack is pristine and dry, you are ready to apply the sealant.
- Insert a backer rod (if needed): For any cracks deeper than 1/2 inch, press a foam backer rod into the crack first. This prevents the liquid sealant from sinking to the bottom of the crack, saving you material and ensuring the sealant adheres properly to the side walls.
- Cut the nozzle: Cut the tip of your caulking tube sealant at a steep angle. Keep the opening small at first — you can always cut it wider if needed.
- Apply the sealant: Place the tip of the nozzle deep into the crack and pull the trigger of the caulking gun. Move slowly and steadily, keeping the bead slightly below the surface of the driveway.
- Smooth the surface: Use a putty knife or a gloved finger to smooth out the sealant, pressing it firmly into the sides of the crack to eliminate air pockets.
- The Sand Blending Trick: To prevent your repair from looking like a shiny, obvious gray line across your driveway, sprinkle a light layer of fine, clean sand over the wet sealant. This matches the texture of the surrounding concrete and helps camouflage the repair beautifully.
Curing and Preventing Future Damage
After applying the sealant, you must protect the repair while it cures.
- Keep traffic off: Avoid walking on the repaired area for at least several hours, and keep vehicles off the driveway for a full 24 to 48 hours, depending on the manufacturer’s instructions.
- Apply a high-quality sealer: Once the crack filler has fully cured, consider applying a penetrating concrete sealer to the entire driveway. This acts like sunscreen for your concrete, protecting it against water penetration, oil stains, and Chicago’s brutal winter road salts.
For more long-term care advice, explore our Don’t Let Your Driveway Crumble with These Maintenance Tips.
Why Concrete Always Cracks: The Permanent Brick Paver Alternative
While patching small cracks is an effective short-term fix, the truth is that concrete always cracks. No matter how well you prep the surface or how expensive your polyurethane sealant is, rigid concrete slabs simply cannot withstand the extreme temperature swings of the Chicago climate forever.
Every winter, the ground beneath your driveway freezes and expands. Every summer, it thaws and settles. Because concrete is a solid, inflexible sheet, this continuous movement puts immense stress on the slab until it snaps.
If you are tired of spending your weekends patching, scraping, and sealing an unsightly concrete driveway, there is a much better, permanent solution: a premium brick paver driveway.
The Long-Term Benefits of Brick Paving Over Concrete
Unlike solid concrete, a brick paver driveway is a flexible paving system. It consists of individual, high-strength interlocking pavers set over a compacted aggregate base.
Here is why Chicago-area homeowners are upgrading to brick pavers:
- Unmatched Flexibility: Because paver driveways are made of individual interlocking pieces, they can flex and shift slightly with the natural movement of the ground. This eliminates the internal tension that causes concrete to crack.
- Incredible Durability: We use premium, lifetime-guaranteed materials from Unilock. These pavers are engineered to withstand heavy vehicle loads and are completely unaffected by freeze-thaw cycles.
- Easy Repairs: If a paver ever becomes stained or damaged, you don’t have to demolish the whole driveway. You simply pop out the single damaged brick and replace it in minutes.
- Unbeatable Curb Appeal: A custom-designed brick driveway instantly elevates your home’s aesthetic and increases your property value far more than plain gray concrete ever could.
At Euro Paving, we are proud to be a premier Unilock authorized contractor Illinois homeowners trust. We offer state-of-the-art 3D paving design and planning, allowing you to visualize your gorgeous new driveway before we even lay the first brick. To avoid the headaches of cracked concrete entirely, read more about Driveway Renovation: Avoiding Common Problems.
Frequently Asked Questions about Driveway Crack Repair
How long does concrete driveway crack filler take to cure?
Most standard water-based fillers dry to the touch in a few hours, but high-performance polyurethane and solvent-based sealants require at least 24 to 48 hours to cure completely. Avoid driving heavy vehicles over the repaired area until the curing window has fully passed, as premature weight can rupture the bond.
When should I use a backer rod for fixing small cracks in concrete driveway?
You should use a foam backer rod for any cracks or joints that are deeper than 1/2 inch or wider than 1/4 inch. The backer rod fills the deep void so you don’t waste expensive sealant, and it ensures the sealant bonds to the vertical walls of the crack rather than pulling away from the bottom.
Can I seal over cracks without repairing them first?
No. Applying a liquid driveway sealer directly over unrepaired cracks is a waste of time and money. The sealer is too thin to fill the void, and water will quickly penetrate the unsealed crack, causing the surrounding concrete to crumble and fail. Always clean and patch cracks before applying a topcoat sealer.
Conclusion
Fixing small cracks in a concrete driveway is a highly effective way to protect your home’s curb appeal and extend the lifespan of your driveway by up to 10 years when done right. By investing a little time in proper cleaning, selecting a high-quality flexible sealant, and blending the finish with sand, you can easily handle minor cosmetic cracks yourself.
However, if you are tired of the endless cycle of cracking, sealing, and patching, it might be time to upgrade to a beautiful, lifetime-guaranteed alternative.
At Euro Paving, we specialize in high-end residential transformations. Beyond building stunning, crack-free driveways, we are the go-to experts for premium brick patio installation Chicago families love. Whether you want to design a custom outdoor living space with the help of the top outdoor kitchen contractors Chicago suburbs have to offer, or you are looking for fresh backyard hardscaping ideas like a cozy fire pit installation near me, our team is here to bring your vision to life.
Ready to say goodbye to cracked concrete and hello to a gorgeous, maintenance-free brick paver driveway? Upgrade to a Premium Brick Paver Driveway and schedule your custom 3D design consultation with Euro Paving today!