



Why Professional Brick Patio Installation Beats DIY (And Protects Your Investment)
If you’ve been scrolling through diy brick patio ideas and wondering whether you can actually pull one off yourself — the short answer is that while a DIY project is tempting, a professional installation is the only way to guarantee a lifetime of durability and beauty.
Here’s a quick overview of what a professional installation delivers:
- Value: A professionally installed brick patio increases home equity and curb appeal instantly.
- Durability: Engineered to withstand Chicago’s severe freeze-thaw cycles without shifting.
- Best method: Multi-layered, mechanically compacted subgrade with commercial-grade edge restraints.
- Premium materials: Unilock authorized concrete pavers and natural clay bricks with lifetime guarantees.
- Key services: 3D design planning, professional excavation, drainage engineering, and expert installation.
Patios now appear in nearly 64% of new U.S. single-family homes, and demand for high-quality hardscaping materials is projected to reach $1.9 billion by 2028. It’s clear that homeowners across the country — including right here in the Chicago suburbs — are investing in their outdoor spaces.
But here’s the honest truth: most DIY patios that fail within a season or two don’t fail because of the bricks. They fail because the base underneath was rushed or lacked commercial-grade compaction. A beautiful herringbone pattern laid over a poorly compacted subgrade will rock, sink, and drift after the first hard Midwest winter.
This guide walks you through everything — from choosing the right premium pavers and patterns to understanding the professional engineering that goes into a base that lasts — so your patio looks just as good in year five as it does on day one.
Explore professional design options:
Planning Your Space: Clay vs. Concrete Pavers and Professional Design
Before starting your hardscaping project, you need a solid plan. A successful hardscaping project balances aesthetics, budget, and physical site constraints. While some homeowners research guides like A Do It Yourself Brick Patio Guide for Homeowners – Rescreen Rescue, professional planning is essential to address natural water movement, downspout discharge, and soil conditions before finalizing where your new outdoor oasis will sit.

Clay vs. Concrete Pavers: Which is Best for Your Home?
Choosing your paving material is the first major design decision. While they might look similar from a distance, clay and concrete pavers are fundamentally different materials with distinct installation challenges.
- Clay Brick Pavers: Made of natural clay fired in a kiln, clay bricks offer a timeless, classic warmth. They are highly durable and hold their rich red and terracotta tones forever without fading. However, because they are fired, clay bricks can vary slightly in size and thickness, requiring expert hands to lay a perfectly level surface.
- Concrete Pavers: Molded from cement and aggregate, concrete pavers are incredibly uniform in size and thickness. This dimensional consistency makes them highly versatile. Modern high-end options — such as those we install from Unilock — feature advanced wear layers that protect their vibrant colors for a lifetime, making them the premier choice for residential and commercial projects alike.
If you are looking to design a space that looks upscale and stands the test of time, explore these Stunning Brick Patio Ideas for Every Budget to see how different materials look in real-world settings.
Professional Material Estimation and Engineering
Building a patio requires precise engineering and material estimation to ensure structural integrity:
- Calculate the Area: Measuring the length and width of your planned patio is just the start. For a standard 10×10 foot patio, your total area is 100 square feet, but complex shapes require advanced geometric calculations.
- The 10% Waste Rule: Professionals always purchase 10% more pavers than the calculated square footage. This accounts for broken bricks, mistakes during cutting, and future repairs. If you are using a complex pattern like herringbone, this margin increases to 15%.
- Nominal vs. Actual Dimensions: A brick’s “nominal” size (e.g., 4″ x 8″) might differ slightly from its actual physical dimensions. Professional installers verify the actual measurements of your chosen paver before finalizing your layout.
- Base Material Estimates: For a long-lasting patio, you will need a 4-to-6-inch layer of compacted gravel and a 1-inch layer of bedding sand. For a 10×10 patio, this equates to roughly 1.5 to 2 tons of gravel and about 0.5 tons of coarse sand, requiring heavy machinery to transport and compact properly.
The Professional Installation Process: How Euro Paving Builds a Bulletproof Base
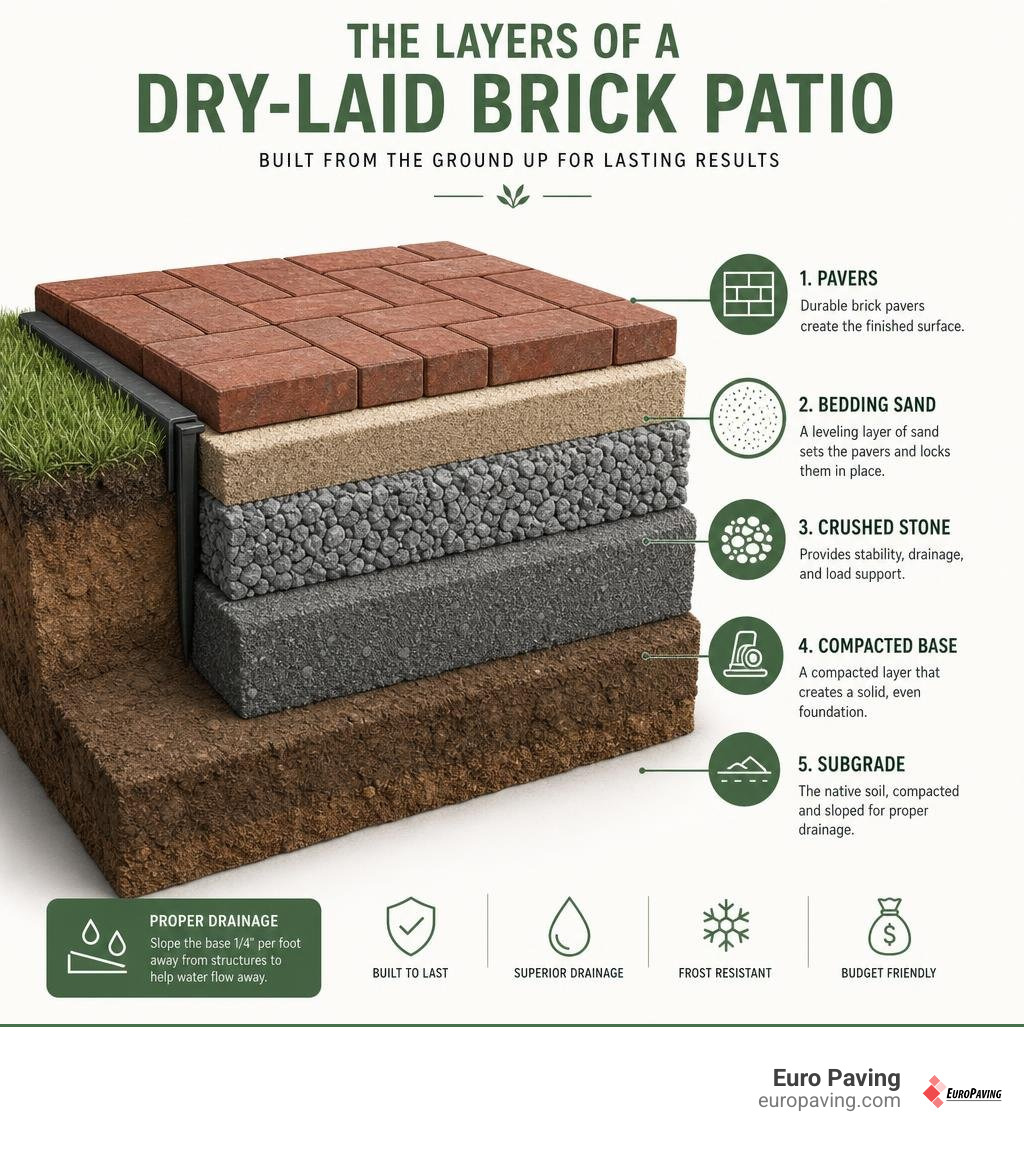
A dry-laid (or sand-set) brick patio is the most popular method for high-quality installations. It relies on compacted gravel, sand, and tight joints to hold the pavers in place. This flexible system allows the patio to expand and contract naturally during changing seasons.
To get professional-grade results, our crews follow a structured step-by-step process, which adapts the proven methods found in How to Build a Brick Paving Patio in 9 Steps.
Preparing a Bulletproof Base: Excavation, Gravel, and Sand
The secret to a patio that stays level for decades lies entirely underground. Rushing your base preparation is the single biggest mistake a DIYer can make, which is why hiring a professional contractor is so critical.
- Check for Utilities: Before any shovel hits the dirt, we call 811 to have underground utility lines marked. This is a free service and is absolutely non-negotiable for safety.
- Excavate the Site: We dig out the patio area to a depth of 7 to 8 inches. We extend our excavation 6 inches beyond the actual footprint of the patio to provide a stable shoulder for your edge restraints.
- Establish the Slope: Your patio must slope away from your home’s foundation to prevent water pooling. We plan for a drop of 1/4 inch per linear foot (or about 1 inch of drop for every 8 to 10 feet of distance) using stakes and tight mason’s lines to guide the slope.
- Compact the Subgrade: We use a commercial plate compactor to thoroughly compact the native soil before adding any materials.
- Add the Gravel Base: We lay down a heavy-duty geotextile landscape fabric to keep weeds from pushing up through the soil. Next, we spread 4 inches of compactible crushed gravel (such as crushed granite or CA-6) in thin 2-inch layers, wetting and compacting each layer individually.
- Screed the Bedding Sand: We lay down two parallel 1-inch iron pipes as leveling guides. We pour coarse concrete sand over the pipes, and run a straight 2×4 board across them to screed a perfectly uniform 1-inch sand bed.
For a deeper look at professional base-laying techniques, check out the classic guidelines from How To Lay an Appealing Brick Patio – This Old House .
Laying the Bricks and Cutting Edges Safely
Once the sand bed is ready, the precise work of laying the pavers begins.
- Set the First Row: We start in a corner (ideally against a straight edge like your home’s foundation). We lay the first row of bricks, keeping them tight against one another.
- Place, Don’t Slide: We gently place each brick directly onto the sand bed. We do not slide them into place, as this would disrupt the smooth sand layer underneath.
- Tap and Level: We use a rubber mallet to gently tap the bricks so they sit flush, checking the level frequently to ensure a flat surface.
- Cutting the Bricks: We use a gas-powered masonry wet saw with a diamond blade for clean, precise cuts. While some guides like DIY Stone Patio: How to Build a Stone and Brick Patio suggest manual chiseling, professional wet saws are required for a clean, modern finish.
Edging and Finishing to Prevent Shifting and Weeds
Without proper containment, the outer edges of your patio will slowly drift outward into your lawn, causing the joints to open up.
- Install Edge Restraints: We place heavy-duty plastic or aluminum paver edging along the entire perimeter of your patio, securing it firmly into the gravel base using metal landscape spikes spaced every 12 inches.
- Apply Polymeric Sand: Once all bricks are laid and edged, we sweep dry polymeric sand across the patio. Polymeric sand contains special binders that activate when wet, locking the bricks together and preventing weed growth and ant infestations.
- Compact and Sweep: We run our plate compactor over the brick surface (using a protective pad to avoid scratching the pavers) to shake the sand deep into the joints, sweeping off any excess sand residue to avoid a permanent white haze.
- Mist to Activate: We set our hose nozzle to a fine mist to activate the polymeric sand, letting it cure for 24 to 48 hours before use.
Inspirational Brick Patio Designs for Your Chicago Home
Now that you know the mechanics of building a patio, let’s talk design. Your backyard hardscaping should feel like a natural extension of your home’s interior style.
If you are looking for modern layouts that seamlessly blend multiple outdoor living zones, take a look at these Brick Patio Designs and Hardscaping Ideas for Modern Homes.
Premium Patterns for Your Brick Patio
The pattern you choose impacts both the visual texture of your space and the structural integrity of your build.
- Basketweave Pattern: This classic pattern features alternating pairs of bricks laid perpendicular to one another. It fits perfectly into square or rectangular dimensions and offers a traditional look.
- Running Bond: In this classic pattern, bricks are laid end-to-end in straight rows, with the joints staggered by half a brick in each row. It is simple, elegant, and highly versatile.
- Herringbone Pattern: Laid at a 45-degree or 90-degree angle, herringbone is the most structurally stable pattern because it locks the pavers together, preventing shifting under heavy loads. It requires a high volume of precise cuts along the borders, which is best handled by professional installers.
Creative Upgrades: Fire Pits, Pergolas, and Monograms
If you want to take your backyard design to the next level, consider incorporating functional features:
- Fire Pit Installation: A built-in stone or brick fire pit makes an incredible focal point for cool evening gatherings in the Chicago suburbs.
- Outdoor Kitchen Zones: Dedicate a flat, stable portion of your brick patio to a custom grill station or outdoor kitchen setup.
- Monogram Inlays: Create a completely custom look by using contrasting paver colors to form a monogram or geometric border inlay in the center of your patio.
- Circular Patios: If you want a softer, more organic layout, a radial circular patio looks beautiful when surrounded by lush garden beds. Learn how to plan one with The Ultimate Guide to Round Brick Patio Design.
Maintaining Your Brick Patio Over Time
A dry-laid brick patio is highly durable, but a little routine maintenance goes a long way in keeping it pristine:
- Regular Sweeping: Keep leaves, dirt, and organic debris off the patio to prevent staining.
- Gentle Pressure Washing: Once a year, give your patio a light wash to remove dirt and mold. Avoid blasting the pressure washer directly into the joints, as this can wash out the polymeric sand.
- Refilling Joint Sand: If you notice the sand in the joints wearing down, simply sweep in a fresh layer of polymeric sand and mist it to lock it back in.
- Apply a Masonry Sealer: Applying a high-quality, breathable masonry sealer every 2 to 3 years protects your bricks from oil spills, UV fading, and water penetration. This is especially helpful around outdoor kitchens or dining areas.
Frequently Asked Questions About DIY Brick Patios
Is a dry-laid (flexible) or mortared brick patio better for DIY?
For DIY projects, a dry-laid (flexible) patio is significantly better. Mortared patios require pouring a professional-grade 4-inch concrete slab, letting it cure, and then setting each brick in a wet mortar bed. This process requires advanced masonry skills, specialized equipment, and offers zero room for error. A dry-laid patio is forgiving, easier to repair, and naturally adapts to ground movement.
How do I fix sunken or shifting patio bricks?
Fixing a low spot in a dry-laid patio is surprisingly simple:
- Use a flat pry bar or a screwdriver to gently lift the sunken bricks out of the pattern.
- Add a few trowels of coarse bedding sand to the low area.
- Screed the sand flat, place the bricks back in, and tap them level with a rubber mallet.
- Sweep fresh polymeric sand into the joints and mist with water.
When should I stop DIY and hire a professional brick patio contractor?
While a small 10×10 backyard patio is a fantastic weekend warrior project, you should consider hiring a professional brick patio contractor under the following conditions:
- Heavy Clay Soils: The Chicago area is famous for its dense, heavy clay soils. Clay retains water, making patios highly susceptible to frost heave during our brutal freeze-thaw cycles. Professionals use specialized commercial excavators and heavy plate compactors to build ultra-deep, stable gravel bases that DIY tools simply cannot replicate.
- Complex Grading and Drainage: If your yard has significant slopes, retaining walls, or water pooling issues, professional engineering is required to prevent water from damaging your home’s foundation.
- Large-Scale Projects: If you are planning a massive multi-level patio, a custom driveway, or an outdoor kitchen, the sheer volume of material (often tens of tons) and the level of precision required makes professional installation the smarter, safer choice.
Conclusion: Let Euro Paving Build Your Dream Backyard
There is a unique pride that comes with building something with your own hands. But if you’ve looked at the sheer physical labor involved — the tons of gravel to shovel, the heavy machinery to rent, and the precision required to survive a Chicago winter — you might decide that your weekends are better spent relaxing.
If you are ready to transition from a DIY dream to a flawless, worry-free reality, we are here to help. As a premier Unilock Authorized Contractor in Illinois, Euro Paving has spent nearly 20 years transforming ordinary backyards across the Chicago suburbs into award-winning outdoor living spaces.
We handle everything from start to finish:
- 3D Paving Design: Visualize your exact patio, fire pit, or outdoor kitchen before we lay a single brick.
- Premium Materials: We build using lifetime-guaranteed Unilock pavers, ensuring your investment stands up to Chicago’s harshest winter freeze-thaw cycles.
- Flexible Financing: Get your dream backyard now and pay over time with the Unilock DO-IT-NOW Program.
Whether you are in Elmhurst, Hinsdale, Mount Prospect, Norridge, Arlington Heights, or anywhere else across Cook and DuPage Counties, our expert crew has the professional equipment and craftsmanship to deliver a stunning result backed by 5-star Google reviews.
Skip the sore back and the rental yard. Schedule a professional consultation for your paver patio with Euro Paving today, and let us build the backyard oasis you’ve always wanted!